

If you love chili cheese dogs but hate how quickly they turn into a soggy, structural mess, you are going to obsess over this cooking method. Instead of fully assembling the dogs ahead of time, the hot dog is built first and the chili is served separately in small cups for tableside pouring. This preserves the snap of the hot dog, the structure of the bun, and the crunch of the onions while creating a molten chili-cheese layer at the moment of eating.

The chili is intentionally finer, smoother, thicker, and more concentrated than traditional bowl chili. It is specifically designed to cling to the hot dog, melt into the cheese, and pour cleanly without making the bun soggy.
Jump to:
Why We Love This Recipe
- Zero Soggy Buns: Serving the chili tableside preserves the structural integrity of the bakery-style bun.
- Next-Level Casing Snap: A quick steam-then-sear technique on the griddle yields perfectly plumped, beautifully blistered hot dogs.
- Finely Textured Chili: Mashed to a luxurious, velvety consistency, this sauce clings to the hot dog perfectly rather than running off.
- Perfect Melt Factor: Layering the cheese underneath the hot chili allows it to melt completely into a rich, molten beef-and-cheese layer.
Ingredients

Hot Dog Chili
- Medium ground beef
- Yellow onion
- Garlic
- Tomato paste
- Chili powder
- Paprika
- Ground cumin
- Kosher salt
- Black pepper
- Onion powder
- Garlic powder
- Worcestershire sauce
- Yellow mustard
- Brown sugar
- beef stock
- Tomato sauce
- Saltine crackers (optional, to thicken)
Mustard Crema
- Mayonnaise
- Yellow mustard
- Sriracha
- Pickle brine
- Lemon juice
- Kosher salt
Hot Dogs & Buns
- All-beef hot dogs
- Hot dog buns
- Butter
- Neutral oil
Toppings
- Sharp cheddar cheese
- White onion
- Crispy shallots, optional
- Pickled jalapeños, optional
See the recipe card below for quantities.
Instructions
Build the Hot Dog Chili
Place a 4.5 Quart Essential Pan, large sauté pan or deep skillet over low to medium-low heat. Add the ground beef to the barely warmed pan.
Using a wooden spoon, stiff spatula, or potato masher, continuously break and press the beef into extremely fine crumbles as it cooks. Do not aggressively brown the meat; avoid large chunks or crusty browned bits. Cook for 8 to 10 minutes until the beef is fully cooked and finely broken down.
Add the minced onion and continue cooking for 5 minutes until softened and beginning to disappear into the beef.
Stir in the garlic and tomato paste. Cook for 2 minutes, stirring constantly, until the tomato paste darkens slightly and coats the meat.

Move the ground beef to make a space in the middle of the pan. Add the chili powder, paprika, cumin, salt, pepper, onion powder, and garlic powder. Cook for 1 minute to bloom the spices.
Pour in the Worcestershire sauce, yellow mustard, brown sugar, beef stock, and tomato sauce. Stir thoroughly and bring to a gentle simmer over medium-low heat.

Reduce heat to low and simmer uncovered for 35 to 45 minutes, stirring occasionally. Every 5 to 10 minutes, continue pressing and breaking the meat with a potato masher. The final texture should resemble a thick, luxurious meat sauce that pours slowly. (If it becomes too thick, loosen with a splash of warm beef stock; if too thin, stir in crushed saltines during the final 5 minutes).
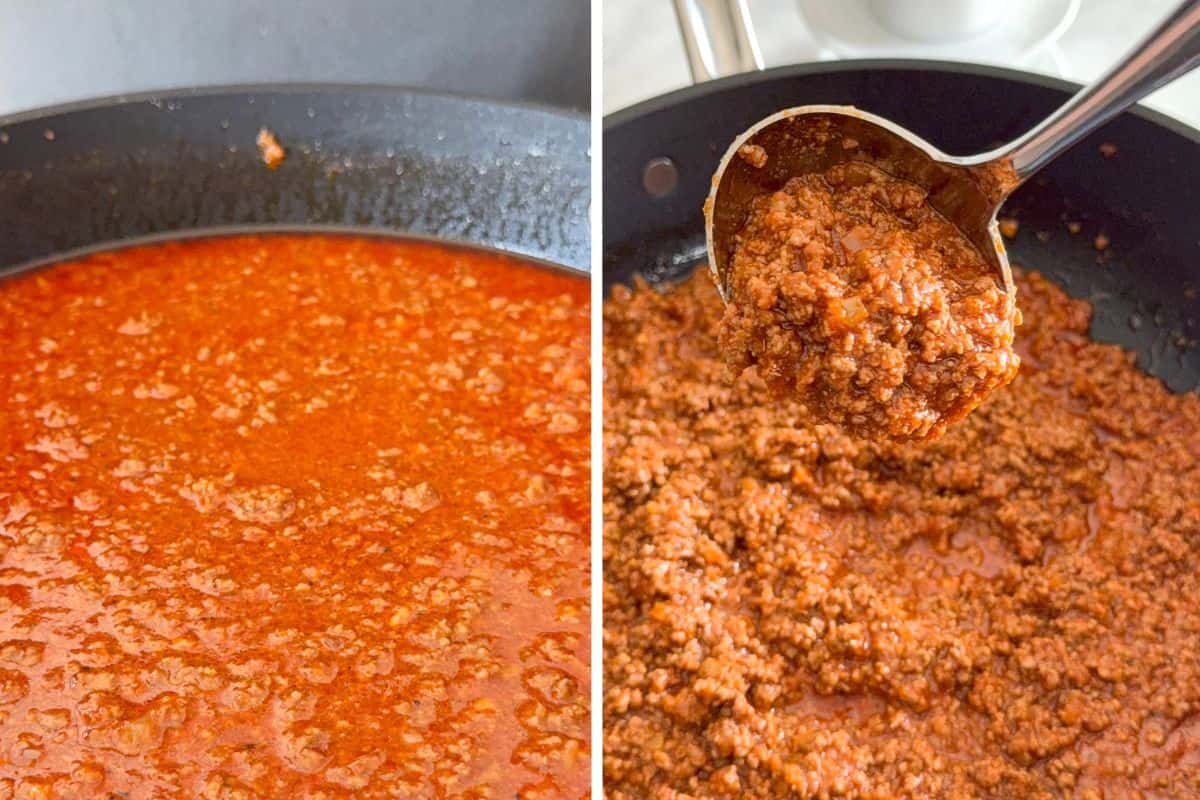
Taste and adjust salt if necessary. Hold warm over the lowest possible heat until serving.
Make the Mustard Crema
Whisk together the mayonnaise, yellow mustard, Sriracha (if using), pickle brine, lemon juice, and a pinch of salt.
Transfer to a squeeze bottle or small bowl and refrigerate until ready to serve.
Prepare the Toppings
Freshly shred the cheddar cheese and finely dice the white onion.
Set out the crispy shallots and optional pickled jalapeños. Keep all toppings cold and dry until serving for maximum texture contrast.
Cook the Hot Dogs on the Griddle
➡️How to Measure Surface Temperature: To get an accurate reading on a stainless steel griddle using an infrared laser thermometer, aim the laser at a spot coated with a thin film of oil. Shiny, bare stainless steel reflects the laser and gives inaccurate readings. If you do not have a thermometer, you can use the water droplet test: splash a few drops of water on the surface. If they immediately dance and skitter across the metal without evaporating instantly, you are in the right temperature zone.
Preheat the griddle: Set one side of your griddle (ideally a Hestan Culinary Double Burner Griddle) to medium or medium-high heat to bring the surface temperature to approximately 400°F (204°C).
Oil the surface: Lightly oil the surface using about 1 teaspoon (5 ml) of neutral oil, then wipe it with a paper towel so only a thin film remains.
Dry the hot dogs: Pat the hot dogs thoroughly dry with paper towels, then place them on the griddle.
Steam to plump: Add 1 to 2 tablespoons of water beside the hot dogs (not directly on top of them) and immediately cover loosely with a basting dome or metal bowl, leaving a slight vent. Steam for 45 to 60 seconds to plump the hot dogs.
Crank the heat: Remove the dome completely and increase the griddle temperature slightly to medium-high or high heat, aiming for a surface temperature of approximately 450°F to 475°F (232°C to 246°C).
Blister and sear: Cook for 4 to 6 minutes, rotating every 30 to 45 seconds, until the hot dogs are browned, blistered and taut.

Griddle the Buns
Lower one side of the griddle to medium heat.
Spread the softened butter lightly on only the cut sides of the buns.
Place the buns cut-side down on the griddle for 1 to 2 minutes until lightly golden and slightly crisp inside, while remaining soft on the outside. Do not toast the exterior of the buns.
Assemble the Base Dogs
Place each griddled hot dog into a toasted bun.
Build your dogs in this exact order: a light swipe of yellow mustard, the blistered hot dog, a generous layer of shredded cheddar directly on top of the hot dog, a light drizzle of mustard crema and diced white onion. Note: Do NOT add the chili yet.
Tableside Chili Service
Transfer the hot chili to espresso cups, small ramekins, or mini pitchers. Plan for approximately ¼ to ⅓ cup of chili per hot dog.
Just before eating, pour the hot chili along the top centerline of the dog, keeping it away from the edges of the bun.

Top with crispy shallots and jalapeños if using. The heat from the chili will activate the cheese melt, creating a perfect melty layer. Serve and eat immediately!

Tips, Substitutions & Serving Suggestions
- Bun Selection Matters: Look for fresh, bakery-style white hot dog buns with a slightly tighter crumb structure. Avoid overly airy brioche buns or dense pretzel buns, which can detract from the balance of the bite.
- Keep the Cheese Under the Chili: Always layer your shredded cheddar directly on top of the hot dog before adding the chili. The pour-over chili acts as a heat blanket, melting the cheese instantly into the meat.
- Make-Ahead Tip: The hot dog chili tastes even better the next day! Prepare it up to 48 hours in advance, store it in an airtight container in the fridge, and gently reheat it on the stovetop before serving.
- Serving Suggestions: Pair these gourmet chili dogs with classic backyard sides like sea salt kettle chips, a crisp cabbage slaw, or grilled corn on the cob. Use any leftover chili as a dip for french fries or tortilla chips!
Transparency is important to us! We are Hestan Culinary ambassadors, and this post contains affiliate links. The thoughts, tips, and results shared in this recipe are 100% our own!

Love This Recipe? Try These Next:
- Charcoal Grilled Bratwurst with Pickled Apples & Sauerkraut
- Coney Hot Dogs with a Mexican Twist
- Beef Smokies (Elote-Style)
- Sizzlin' Smokies with Kimchi, Pickled Veggies & Crispy Shallots
- Grilled Smokie Pizza Sandwiches
📖 Recipe

Tableside Pour-Over Chili Cheese Dogs
Ingredients
Hot Dog Chili
- 2 ¼ lbs medium ground beef 1 kg
- 1 medium yellow onion very finely minced
- 4 cloves garlic finely grated
- 4 tablespoons tomato paste 60 ml
- 2 tablespoons chili powder 30 ml
- 2 teaspoons paprika
- 1 teaspoon ground cumin
- 1 teaspoon kosher salt plus more to taste
- ½ teaspoon freshly ground black pepper
- ½ teaspoon onion powder
- ½ teaspoon garlic powder
- 1 teaspoon Worcestershire sauce
- 2 teaspoons yellow mustard
- 1 teaspoon brown sugar
- 2 cups beef stock 480 ml (low-sodium or no salt added)
- 1 cup tomato sauce 240 ml
- 1 tablespoon finely crushed saltine crackers optional, to thicken
Mustard Crema
- ⅓ cup mayonnaise 80 ml
- 2 tablespoons yellow mustard 30 ml
- 1 to 2 tablespoons Sriracha to taste, optional
- 1 teaspoon pickle brine
- 1 teaspoon fresh lemon juice
- 1 pinch kosher salt
Hot Dogs & Buns
- 8 all-beef natural casing hot dogs
- 8 bakery-style white hot dog buns tighter crumb, medium size
- 2 tablespoons softened butter
- 1 teaspoon neutral oil for the griddle
Toppings
- 2 cups freshly shredded sharp cheddar cheese 225 g
- 1 cup finely diced white onion 150 g
- ½ cup crispy shallots 30 g
- Pickled jalapeños optional
Instructions
Build the Hot Dog Chili
- Place a 4.5 Quart Essential Pan, large sauté pan or deep skillet over low to medium-low heat. Add the ground beef to the barely warmed pan.
- Using a wooden spoon, stiff spatula, or potato masher, continuously break and press the beef into extremely fine crumbles as it cooks. Do not aggressively brown the meat; avoid large chunks or crusty browned bits. Cook for 8 to 10 minutes until the beef is fully cooked and finely broken down.
- Add the minced onion and continue cooking for 5 minutes until softened and beginning to disappear into the beef.
- Stir in the garlic and tomato paste. Cook for 2 minutes, stirring constantly, until the tomato paste darkens slightly and coats the meat.
- Move the ground beef to make a space in the middle of the pan. Add the chili powder, paprika, cumin, salt, pepper, onion powder, and garlic powder. Cook for 1 minute to bloom the spices.
- Pour in the Worcestershire sauce, yellow mustard, brown sugar, beef stock, and tomato sauce. Stir thoroughly and bring to a gentle simmer over medium-low heat.
- Reduce heat to low and simmer uncovered for 35 to 45 minutes, stirring occasionally. Every 5 to 10 minutes, continue pressing and breaking the meat with a potato masher. The final texture should resemble a thick, luxurious meat sauce that pours slowly. (If it becomes too thick, loosen with a splash of warm beef stock; if too thin, stir in crushed saltines during the final 5 minutes).
- Taste and adjust salt if necessary. Hold warm over the lowest possible heat until serving.
Make the Mustard Crema
- Whisk together the mayonnaise, yellow mustard, Sriracha (if using), pickle brine, lemon juice, and a pinch of salt.
- Transfer to a squeeze bottle or small bowl and refrigerate until ready to serve.
Prepare the Toppings
- Freshly shred the cheddar cheese and finely dice the white onion.
- Set out the crispy shallots and optional pickled jalapeños. Keep all toppings cold and dry until serving for maximum texture contrast.
Cook the Hot Dogs on the Griddle
- Preheat the griddle: Set one side of your griddle (ideally a Hestan Culinary Double Burner Griddle) to medium or medium-high heat to bring the surface temperature to approximately 400°F (204°C).
- Oil the surface: Lightly oil the surface with about 1 teaspoon (5 ml) of neutral oil, then wipe it with a paper towel until only a thin film remains.
- Dry the hot dogs: Pat the hot dogs thoroughly dry with paper towels, then place them on the griddle.
- Steam to plump: Add 1 to 2 tablespoons of water beside the hot dogs (not directly on top of them) and immediately cover loosely with a basting dome or metal bowl, leaving a slight vent. Steam for 45 to 60 seconds to plump the hot dogs.
- Crank the heat: Remove the dome completely and increase the griddle temperature slightly to medium-high or high heat, aiming for a surface temperature of approximately 450°F to 475°F (232°C to 246°C).
- Blister and sear: Cook for 4 to 6 minutes, rotating every 30 to 45 seconds, until the hot dogs are browned, blistered and taut.
Griddle the Buns
- Lower one side of the griddle to medium heat.
- Spread the softened butter lightly on only the cut sides of the buns.
- Place the buns cut-side down on the griddle for 1 to 2 minutes until lightly golden and slightly crisp inside, while remaining soft on the outside. Do not toast the exterior of the buns.
Assemble the Base Dogs
- Place each griddled hot dog into a toasted bun.
- Build your dogs in this exact order: a light swipe of yellow mustard, the blistered hot dog, a generous layer of shredded cheddar directly on top of the hot dog, a light drizzle of mustard crema and diced white onion.
- Note: Do NOT add the chili yet.
Tableside Chili Service
- Transfer the hot chili to espresso cups, small ramekins, or mini pitchers. Plan for approximately ¼ to ⅓ cup of chili per hot dog.
- Just before eating, pour the hot chili along the top centerline of the dog, keeping it away from the edges of the bun.
- Top with crispy shallots and jalapeños if using. The heat from the chili will activate the cheese melt, creating a perfect melty layer. Serve and eat immediately!
💬Tried this Recipe?
- We'd really appreciate a rating and quick review! It helps more home cooks find the recipe, and we love hearing what you think.
Video
Notes
Tips, Substitutions & Serving Suggestions
- Bun Selection Matters: Look for fresh, bakery-style white hot dog buns with a slightly tighter crumb structure. Avoid overly airy brioche buns or dense pretzel buns, which can detract from the balance of the bite.
- Keep the Cheese Under the Chili: Always layer your shredded cheddar directly on top of the hot dog before adding the chili. The pour-over chili acts as a heat blanket, melting the cheese instantly into the meat.
- Make-Ahead Tip: The hot dog chili tastes even better the next day! Prepare it up to 48 hours in advance, store it in an airtight container in the fridge, and gently reheat it on the stovetop before serving.
- Serving Suggestions: Pair these gourmet chili dogs with classic backyard sides like sea salt kettle chips, a crisp cabbage slaw, or grilled corn on the cob. Use any leftover chili as a dip for french fries or tortilla chips!
Leave a Reply