

Golden, wonderfully crisp, savoury apple tarts with puff pastry meet warm, herb-butter-roasted Honeycrisp slices in these elegant individual appetizers. Sweet, tender fruit takes center stage here, balanced by rich aged cheddar, jammy fig, and toasted walnuts in every bite. Serve them hot alongside a peppery arugula salad for a polished dinner party starter, feature them on an autumn brunch table, or pair them with a glass of crisp dry cider for casual holiday entertaining.
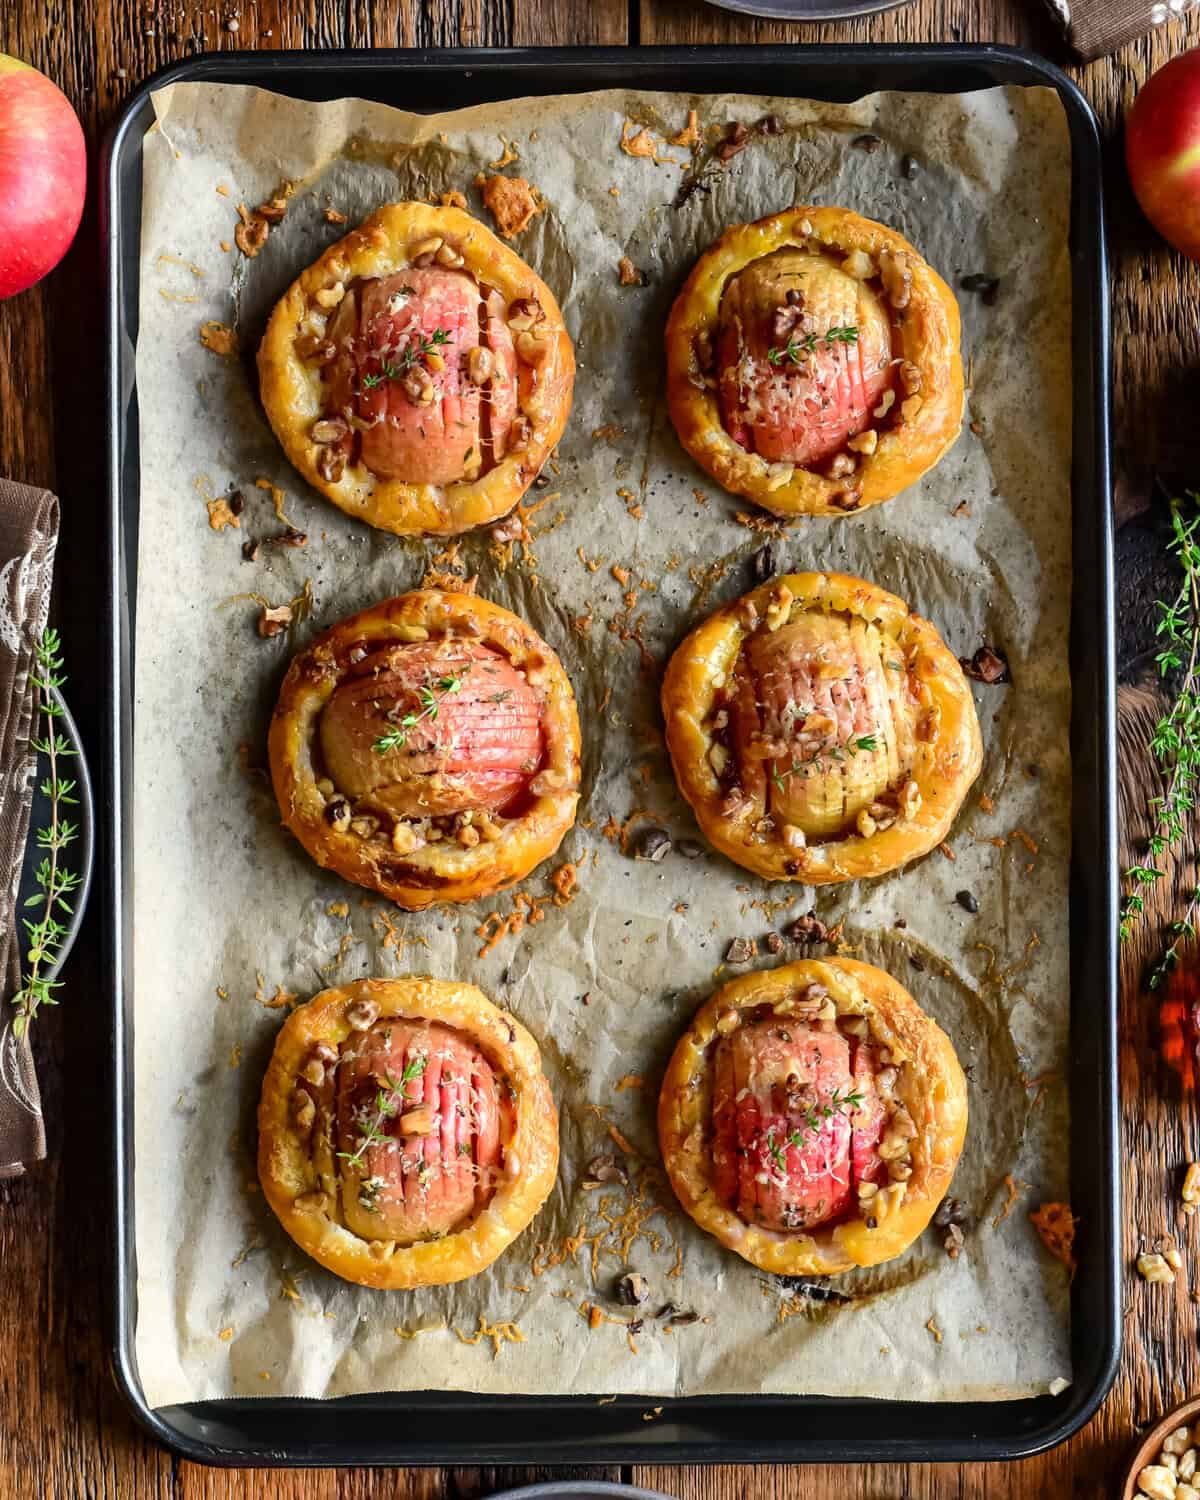
This Honeycrisp Apple Tarts with Puff Pastry & Cheddar recipe was created in partnership with the Ontario Produce Marketing Association. Opinions in this post are always our own.
Jump to:
Why We Love This Recipe
- Textural Contrast: Features tender, butter-roasted Honeycrisp apple slices set against crispy, flaky puff pastry.
- Built for Baking: Ontario Honeycrisp apples hold their crisp, distinct structure in high heat, yielding a tender, melt-in-your-mouth bite that never turns mushy or watery.
- Make-Ahead Friendly: Pre-roasting and cooling the apples prevents soggy pastry bottoms and keeps the workflow effortless when entertaining.
- Versatile Finishing Options: Tastes exceptional as written or drizzled with hot honey or warm maple syrup for an extra kick.
- Hasselback Magic: Precision-slicing the Honeycrisp apples allows the herb butter to penetrate deep into the fruit while helping the slices fan open naturally as they roast.
- Elevated Natural Sweetness: Roasting the apples with fresh thyme and sea salt draws out their natural juices and deepens their sweetness without needing added sugar.
What is a Hasselback Apple?
The Hasselback technique involves making a series of thin, parallel cuts partially through an ingredient without slicing all the way through. Originally created for potatoes at Stockholm’s Hasselbacken restaurant, applying this technique to apples creates extra surface area for herb butter, allows heat to penetrate evenly, and causes the slices to fan open beautifully as they bake.
Ingredients
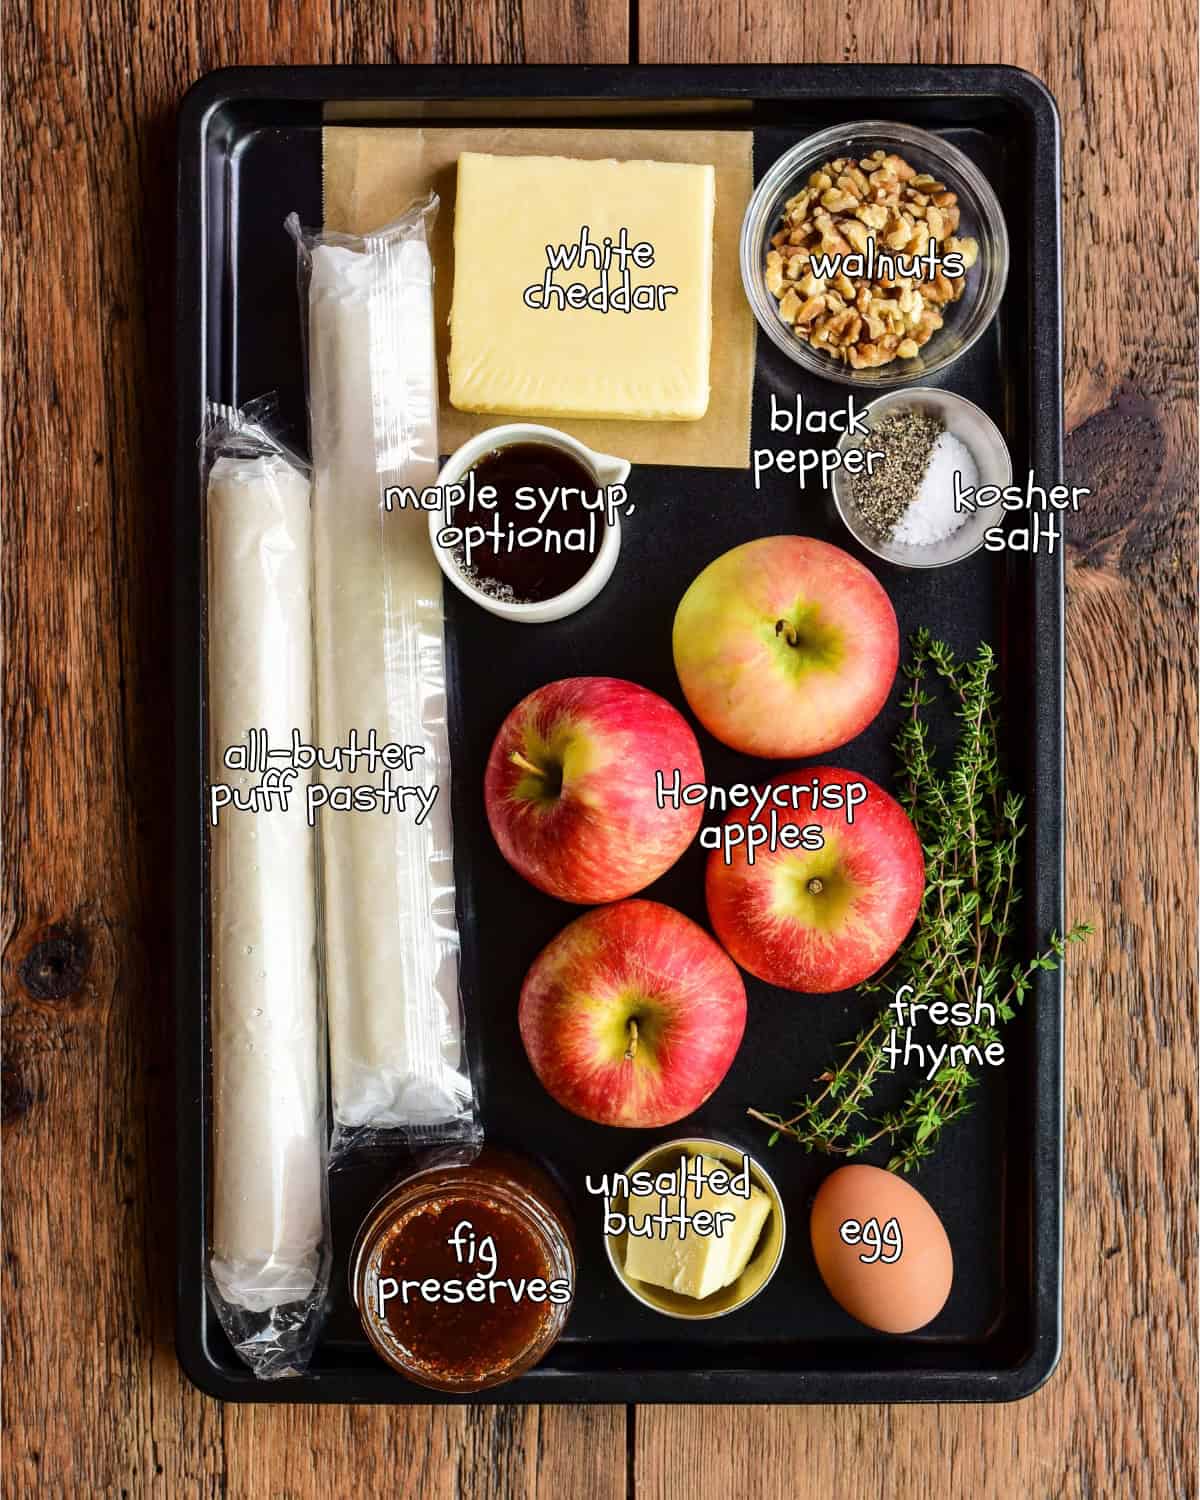
Hasselback Apples
- Ontario Honeycrisp apples
- Unsalted butter
- Fresh thyme leaves
- Kosher salt
- Black pepper
Tarts
- All-butter puff pastry
- Aged white cheddar
- Fig preserves
- Egg
- Water
- Walnuts
To Finish
- Fresh thyme leaves
- Black pepper
- Flaky salt (optional)
- Maple syrup or hot honey (optional)
See the recipe card below for quantities.
Instructions
Preheat your oven to 400°F (200°C) convection or 425°F (220°C) conventional. Line a sheet pan with parchment paper.
Prepare the Honeycrisp Apples
Slice and Core: Cut each Honeycrisp vertically in half through the stem to create 8 apple halves. Using a melon baller or small spoon, carefully remove the core from each half, creating a neat channel while keeping the rest of the apple intact.

Hassleback the Apples: Place an apple half cut-side down, between two chopsticks or wooden spoon handles. Slice crosswise, perpendicular to the core channel, working from the stem end down toward the bottom of the apple. Make parallel crosswise cuts approximately ⅛ inch (3 mm) apart, stopping about ¼ inch (6 mm) from the bottom so the slices stay connected at the base. Repeat with the remaining apple halves. Do not manually force the slices open; they will relax and fan out naturally in the heat.
Partially Roast the Apples
➡️Why Par-Roast the Apples First? Apples contain a high volume of water. Slicing and par-roasting them cut-side down evaporates surface moisture and begins the tenderizing process. Cooling them completely before placing them on puff pastry ensures the pastry fat stays cold, yielding maximum lift and a crisp bottom crust.
In a small bowl, combine the melted butter, thyme, salt, and several grinds of black pepper. Brush the mixture thoroughly over the apples, working some between the sliced cuts using a knife to help slightly open the slices.
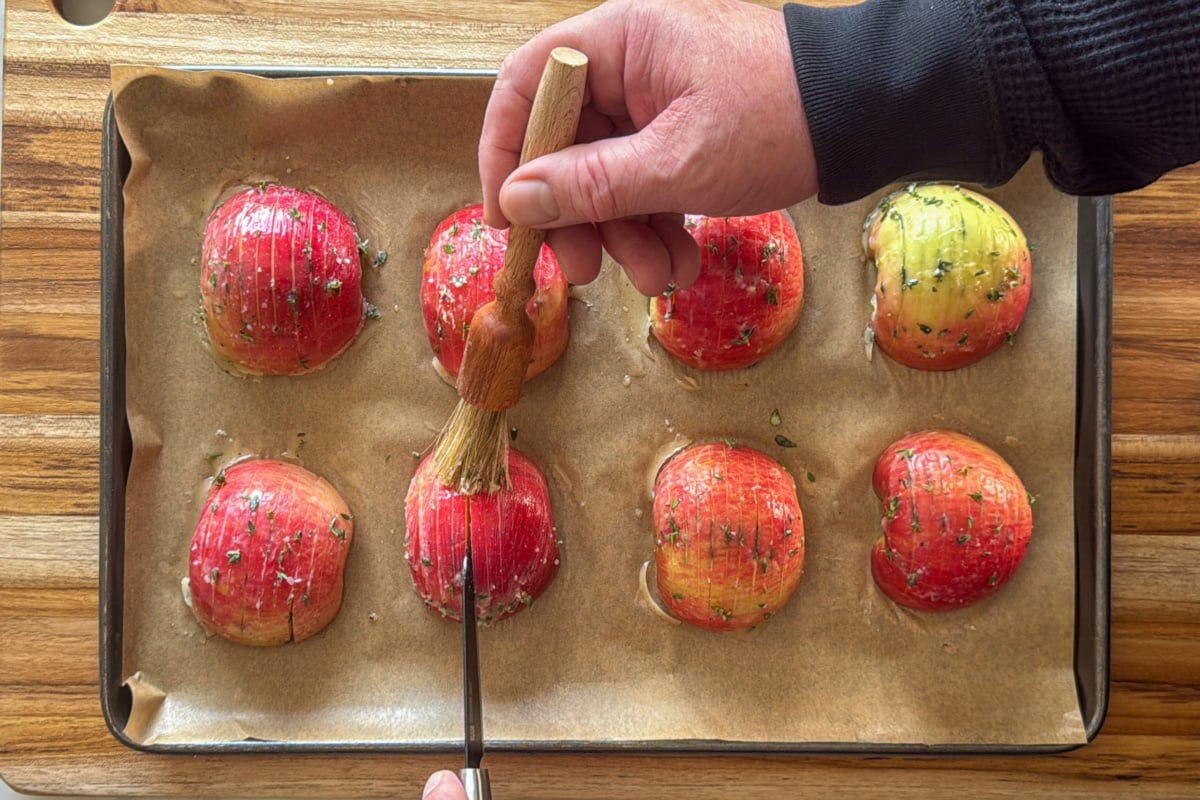
Arrange the apples cut-side down on the prepared sheet pan. Roast for 10 to 13 minutes, checking at the 10-minute mark. The apples are ready for the next stage when the Hasselback cuts begin to relax, but the fruit remains firm to the touch.
Cool Completely
Transfer the apple halves to a wire rack or plate. Let cool at room temperature for 15 minutes, then refrigerate uncovered for 15 to 20 minutes. The apples must be completely cold before assembling on the puff pastry.
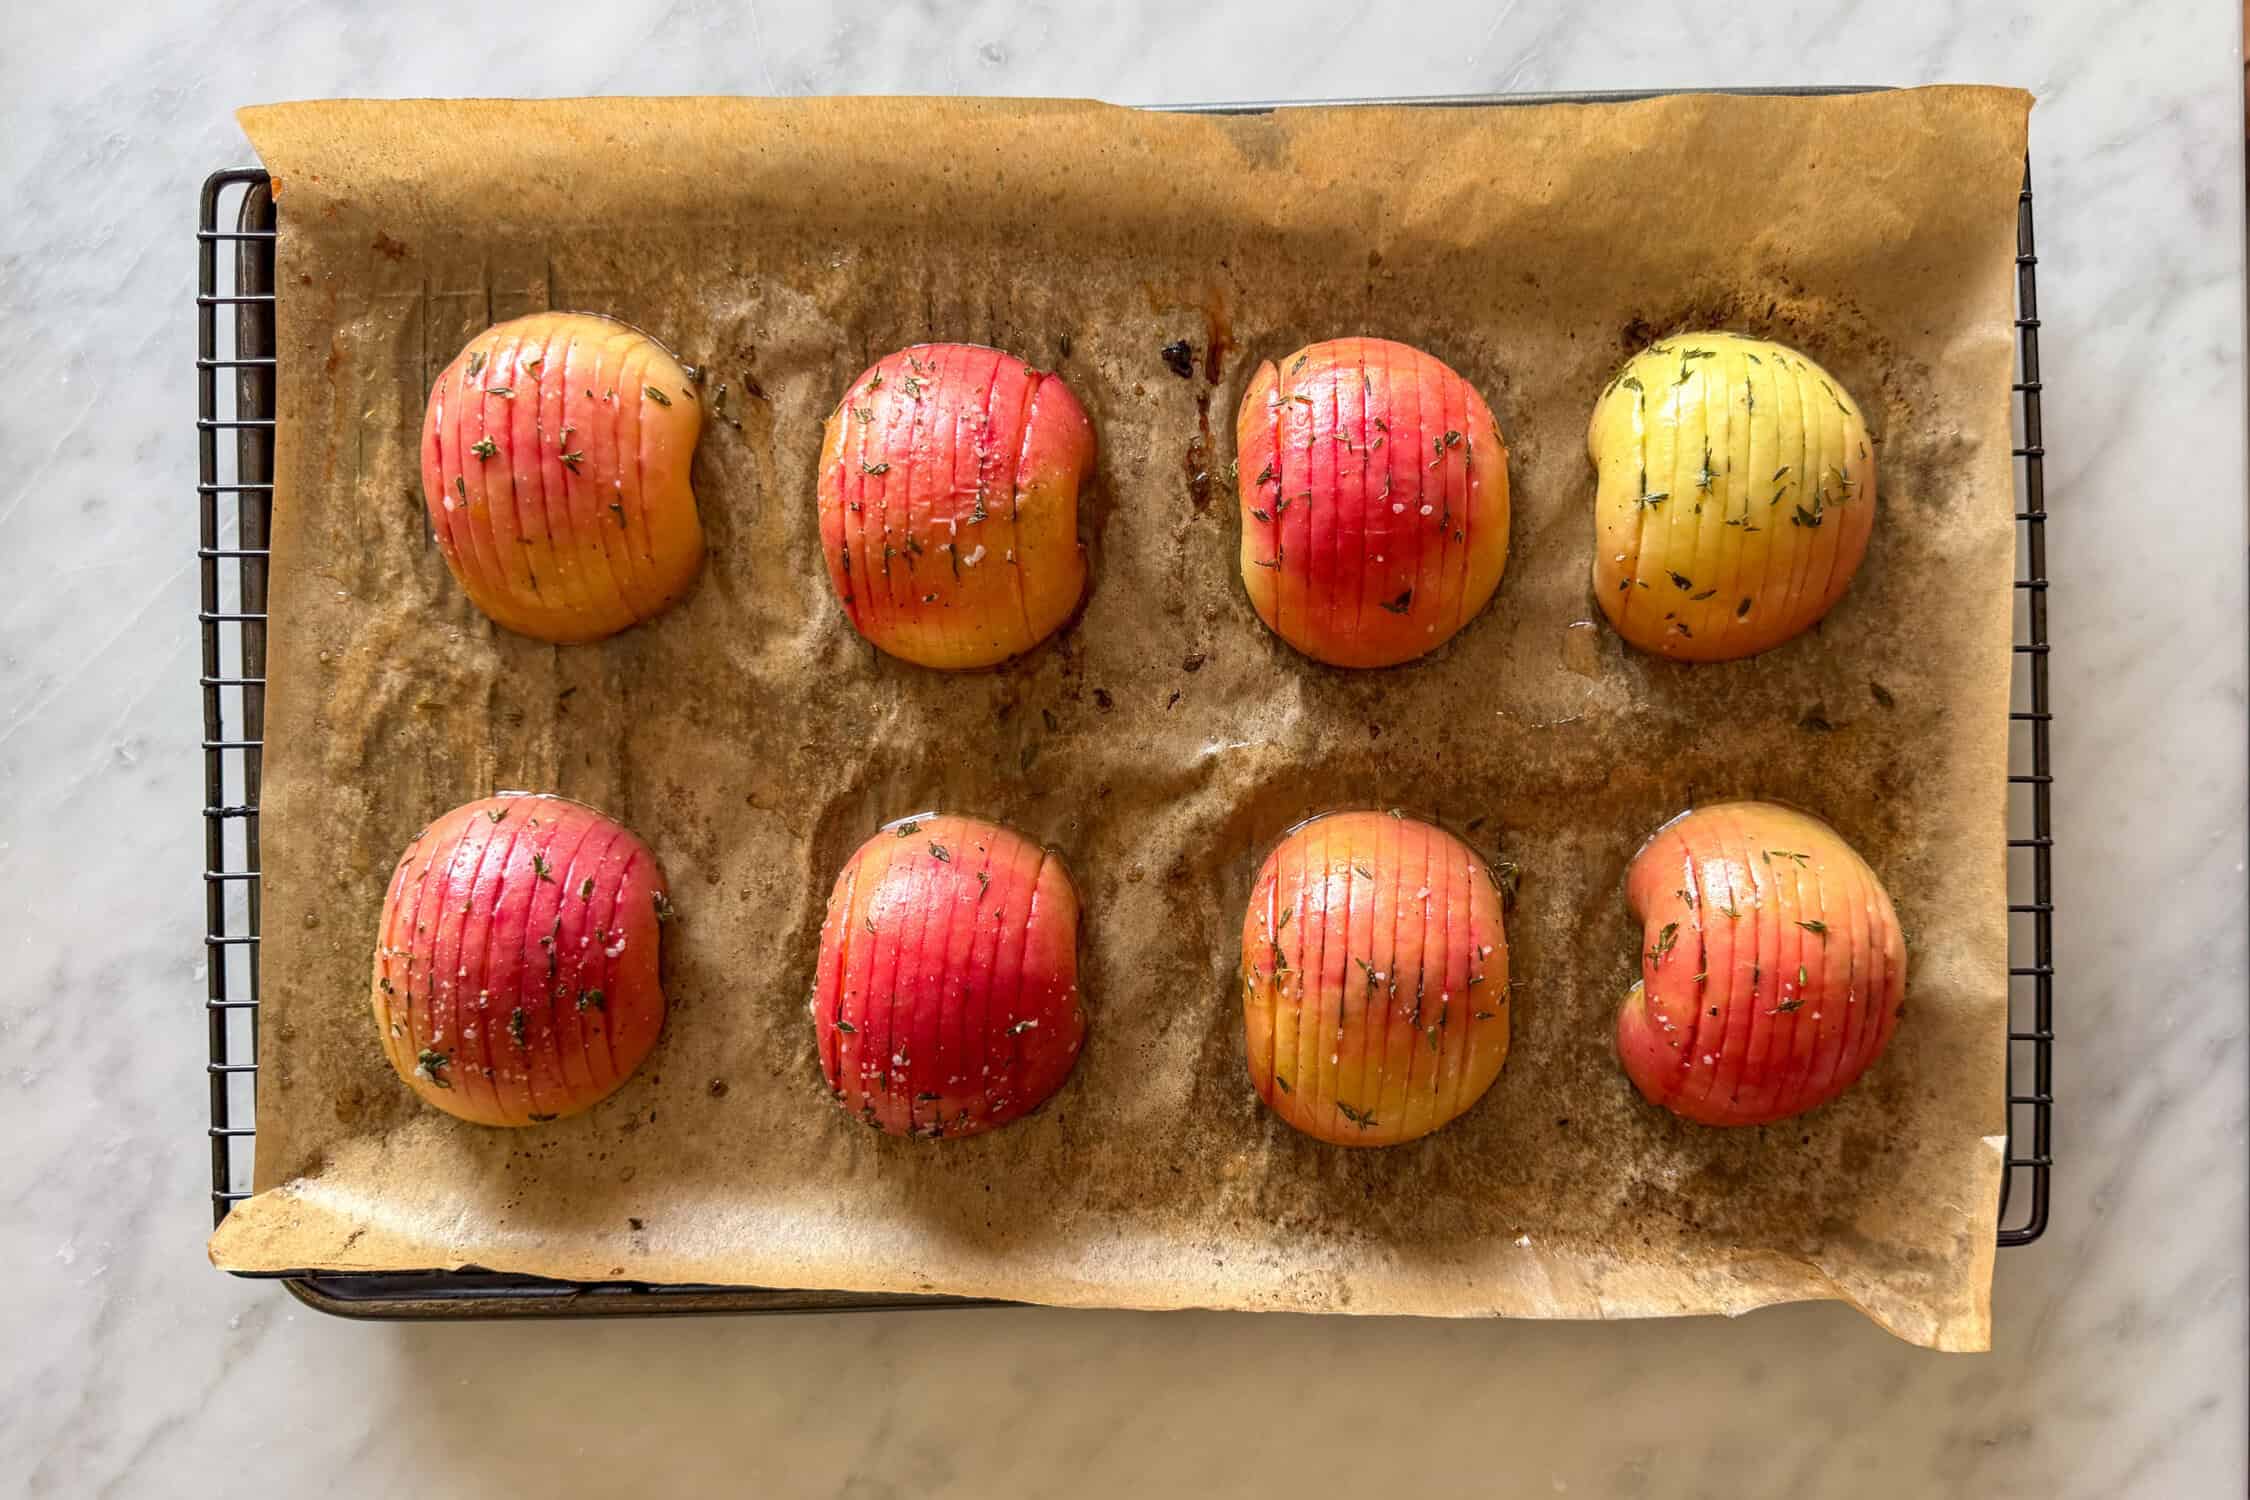
Cut Pastry Circles
Unroll the cold puff pastry on parchment paper or a lightly floured surface. Lightly roll out any packing wrinkles with a rolling pin.
Place one cooled apple half on the pastry to gauge the correct circle size. Aim for ½ inch to ¾ inch (13 mm to 19 mm) of exposed pastry surrounding the apple footprint. Cut 8 equal pastry circles using a round cookie cutter or knife (see Tips below for cutter-free alternatives). Transfer the circles onto parchment-lined baking sheets.

Score & Dock the Pastry
Using the tip of a sharp paring knife, lightly score a border ½ inch (13 mm) inside the edge of each circle without cutting through the pastry.

Temporarily place an apple half in the center of each circle to identify its footprint, then remove it. Use a fork to dock (prick) only the inner area directly underneath the apple. Do not dock the scored outer border. Return the pastry to the refrigerator if it softens.
Assemble the Cheese and Fig Preserves
Divide the grated cheddar. Spread 3 oz / 80 g evenly among the eight pastry circles within the docked footprint, leaving the scored border clean. Reserve the remaining ½ oz (20 g) cheddar for the final bake step.
Inspect the underside of each cooled apple half and pat thoroughly dry with paper towels. Spoon 1 teaspoon (5 ml) of thick fig preserves directly into the cored channel of each apple half. Place one filled apple half cut-side down over the cheddar on each pastry circle.

Egg Wash, Chill & Bake
Whisk the egg with 1 tablespoon (15 ml) water. Lightly brush the exposed outer pastry border with the egg wash.
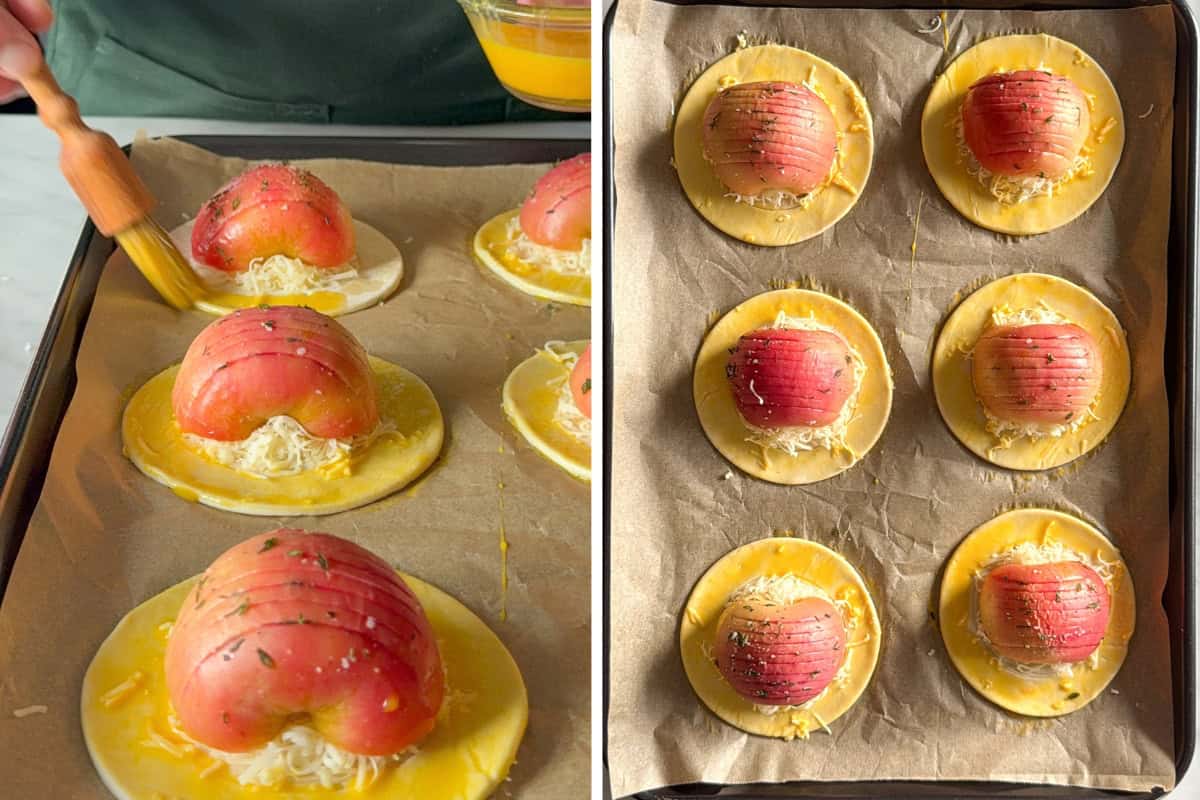
Chill the assembled tarts in the refrigerator for 10 to 15 minutes until cold and firm. Increase or adjust your oven temperature to 425°F (220°C) convection.
Slide the sheet pans into the oven and bake for 12 minutes uninterrupted. Once the outer borders are puffed and turning light golden, quickly open the oven. Sprinkle the reserved cheddar over the borders and onto the sliced apple tops, and scatter the chopped walnuts across the tarts.
Rotate the sheet pans and bake for an additional 6 to 9 minutes (18 to 21 minutes total bake time). The tarts are done when the pastry is deeply golden, the bottoms are crisp, the cheese is melted and bubbling, and the apples are tender when pierced with a paring knife.
Rest & Serve
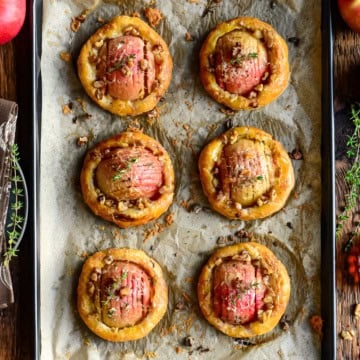
Transfer the tarts to a wire cooling rack immediately and rest for 3 to 5 minutes to let trapped steam escape, preserving crisp bottoms. Finish with fresh thyme, freshly ground black pepper, and optional flaky salt or a drizzle of hot honey. Serve warm.
Tips, Substitutions & Serving Suggestions
How & When to Serve These Tarts
- Autumn Cocktail Hour: Serve warm on a wooden platter with a glass of dry sparkling wine, prosecco, or crisp hard cider to balance the rich butter pastry.
- Plated First Course: Place a warm tart on a salad plate next to Simple Green Salad with Shallot Vinaigrette or an Apple, Fennel & Parmesan Salad.
- Brunch Spread: Serve warm alongside thick-cut bacon, soft scrambled eggs, or a savoury quiche.
Working with Puff Pastry
- Keep It Cold: Cold butter layers create the steam responsible for puff pastry’s high rise. If the dough gets soft or sticky at any point during prep, return it to the refrigerator for 10 minutes.
- Sharp Cuts Only: Use a crisp, sharp cutter or knife. Dull blades crush dough edges together, sealing the pastry layers and preventing an even rise.
Round Cutter Options & Alternatives
- No Large Cookie Cutters? Use a small bowl, glass, or empty tin can (approx. 4½ to 5 inches) as a template and cut around it with a sharp knife.
- Go Square: Skip cutting round circles altogether. Cut your pastry sheets into 8 equal square tiles. Square tarts look beautifully rustic and eliminate dough waste.
Frequently Asked Questions
A: Yes. You can par-roast the apples up to 24 hours in advance and keep them covered in the refrigerator. Assemble and bake the tarts fresh right before serving to maintain crisp puff pastry.
A: Soggy bottoms usually stem from warm apples releasing steam onto cold dough, or failing to pat the apple undersides dry. Cooling the apples completely and resting the baked tarts on a wire rack prevents moisture accumulation.
A: Ontario Honeycrisp apples are ideal because they hold their structural shape when cooked while providing a sweet-tart balance. Gala, Pink Lady, or Cortland also work well.

Other Honeycrisp Apple Recipes To Try Next:
- Apple Cider Glazed Chicken with Apples and Fennel
- Apple, Leek & Bacon Quiche
- Fall Harvest Salad with Apple Cider Vinaigrette
- Cider Braised Cabbage with Ham Bone and Apples
📖 Recipe
Honeycrisp Apple Tarts with Puff Pastry & Cheddar
Ingredients
➡️Note on Scaling the Recipe: When scaling to 2X or 3X, the light grey ingredient notes and the instructions remain unchanged. Please adjust as needed.
Hasselback Apples
- 4 medium-small Ontario Honeycrisp apples approximately 5 oz to 6 oz (140 g to 170 g) each
- 2 tablespoon unsalted butter 30 ml, melted
- 2 teaspoon fresh thyme leaves 10 ml, finely chopped
- ¼ teaspoon kosher salt 1 ¼ ml
- Freshly ground black pepper to taste
Tarts
- 2 sheets all-butter puff pastry about 1 lb total (450 g), thawed but cold
- 3½ oz aged white cheddar 100 g, finely grated
- 8 teaspoon thick fig preserves 40 ml, approximately 1 teaspoon (5 ml) per tart
- 1 large egg
- 1 tablespoon water 15 ml
- ¼ cup walnuts 60 ml, roughly chopped
To Finish
- Fresh thyme leaves
- Freshly ground black pepper
- Flaky salt optional
- Maple syrup or hot honey optional
Instructions
Preheat & Prep Your Oven
- Preheat your oven to 400°F (200°C) convection or 425°F (220°C) conventional. Line a sheet pan with parchment paper.
Prepare the Honeycrisp Apples
- Slice and Core: Cut each Honeycrisp vertically in half through the stem to create 8 apple halves. Using a melon baller or small spoon, carefully remove the core from each half, creating a neat channel while keeping the rest of the apple intact.
- Hassleback the Apples: Place an apple half cut-side down, between two chopsticks or wooden spoon handles. Slice crosswise, perpendicular to the core channel, working from the stem end down toward the bottom of the apple. Make parallel crosswise cuts approximately ⅛ inch (3 mm) apart, stopping about ¼ inch (6 mm) from the bottom so the slices stay connected at the base. Repeat with the remaining apple halves. Do not manually force the slices open; they will relax and fan out naturally in the heat.
Partially Roast the Apples
- In a small bowl, combine the melted butter, thyme, salt, and several grinds of black pepper. Brush the mixture thoroughly over the apples, working some between the sliced cuts using a knife to help slightly open the slices.
- Arrange the apples cut-side down on the prepared sheet pan. Roast for 10 to 13 minutes, checking at the 10-minute mark. The apples are ready for the next stage when the Hasselback cuts begin to relax, but the fruit remains firm to the touch.
Cool Completely
- Transfer the apple halves to a wire rack or plate. Let cool at room temperature for 15 minutes, then refrigerate uncovered for 15 to 20 minutes. The apples must be completely cold before assembling on the puff pastry.
Cut Pastry Circles
- Unroll the cold puff pastry on parchment paper or a lightly floured surface. Lightly roll out any packing wrinkles with a rolling pin.
- Place one cooled apple half on the pastry to gauge the correct circle size. Aim for ½ inch to ¾ inch (13 mm to 19 mm) of exposed pastry surrounding the apple footprint. Cut 8 equal pastry circles using a round cookie cutter or knife (see Tips below for cutter-free alternatives). Transfer the circles onto parchment-lined baking sheets.
Score & Dock the Pastry
- Using the tip of a sharp paring knife, lightly score a border ½ inch (13 mm) inside the edge of each circle without cutting through the pastry.
- Temporarily place an apple half in the center of each circle to identify its footprint, then remove it. Use a fork to dock (prick) only the inner area directly underneath the apple. Do not dock the scored outer border. Return the pastry to the refrigerator if it softens.
Assemble the Cheese and Fig Preserves
- Divide the grated cheddar. Spread 3 oz / 80 g evenly among the eight pastry circles within the docked footprint, leaving the scored border clean. Reserve the remaining ½ oz (20 g) cheddar for the final bake step.
- Inspect the underside of each cooled apple half and pat thoroughly dry with paper towels. Spoon 1 teaspoon (5 ml) of thick fig preserves directly into the cored channel of each apple half. Place one filled apple half cut-side down over the cheddar on each pastry circle.
Egg Wash, Chill & Bake
- Whisk the egg with 1 tablespoon (15 ml) water. Lightly brush the exposed outer pastry border with the egg wash.
- Chill the assembled tarts in the refrigerator for 10 to 15 minutes until cold and firm. Increase or adjust your oven temperature to 425°F (220°C) convection.
- Slide the sheet pans into the oven and bake for 12 minutes uninterrupted. Once the outer borders are puffed and turning light golden, quickly open the oven. Sprinkle the reserved cheddar over the borders and onto the sliced apple tops, and scatter the chopped walnuts across the tarts.
- Rotate the sheet pans and bake for an additional 6 to 9 minutes (18 to 21 minutes total bake time). The tarts are done when the pastry is deeply golden, the bottoms are crisp, the cheese is melted and bubbling, and the apples are tender when pierced with a paring knife.
Rest & Serve
- Transfer the tarts to a wire cooling rack immediately and rest for 3 to 5 minutes to let trapped steam escape, preserving crisp bottoms. Finish with fresh thyme, freshly ground black pepper, and optional flaky salt or a drizzle of hot honey. Serve warm.
💬Tried this Recipe?
- We'd really appreciate a rating and a quick review! It helps more home cooks find the recipe, and we love hearing what you think.

Leave a Reply